Bio
Contact
Professional Photography/Video Services - Punta Gorda, Florida
Industrial/Commercial-Architecture-Composites-Portraits-Scenics-Nature-Pano Photo-Video-Photo Techniques-Site Map


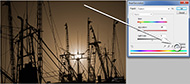
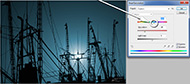
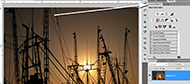
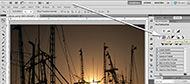
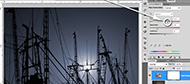
Colorizing and enhancing sunsets and silhouettes Form time to time I'll shoot a sunset or silhouette that is not quite what I want or might have a client that asked for certain colors to match a published promotion. There are two quick ways to enhance that image; one is a destructive correction (once saved cannot be undone) and the other is nondestructive (easily change back to the original or additional adjustments made after being saved). This tip covers both techniques. Destructive Method 1) Open your image using Photoshop then go to the 'menu/image/adjustments/and scroll down to hue/saturation' or use the keyboard command 'Ctrl U'. 2) A new window opens labeled Hue/Saturation. Click on the 'Preview' check box to view live changes and above that box is 'Colorize' check that as well (Fig 2) 3) Now you have unlimited possibilities for making color changes. Begin with grabbing the triangle slider for 'Hue'. Slide left or right to get a color that you like. Below that is 'Saturation' slider which can enhance or lower the intensity of your chosen color. Last you can change the overall lightness and darkness of your image with the 'Lightness' slider. (Fig 3) Non Destructive Method 4) I use the above method mostly for fast enhancements but there is a better method which allows additional change or reverting back on the same image document. Find the 'Adjustment' tab and make it active by clicking on that tab. It should be on the right hand side of your PS application. If not go to the 'menu/view/adjustments' and it will be the active window on the right. (Fig 4) 5) In the 'Adjustments' window several square options are available, the 'Hue/Saturation' will be in the second row second icon from the left (Fig 5) Click to activate. 6) Click on the 'Colorize' check box (fig 6) 7) The same sliders are available as before with the destructive method. Grab the slider triangle 'Hue'-to change color-'Saturation' to increase or decrease value and 'Lightness' to darken or lighten the overall image (Fig 7) and save your document. 8) Look at figure 8 and notice a new layer was created by PS. If you click on the 'eye' it will turn the effect on and off. If at a later time a day month or later the original is there and you can still make new modifications. To make new changes make sure that layer is active by clicking on it to change to new values. |
 |
|
fig 2 |
Fig 3 |
|
Fig 4 |
Fig 5 |
|
Fig 6 |
Fig 7 |
|
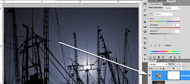 Fig 8 |
||

All material within this website is copyright © 2006